Tuesday, December 13, 2011

Sierra Nuggets (aka ... full of spices chocolate chip cookies)

Many many years ago when I was a little girl, my aunt made these cookies.  I fell in love.  Their spices just created an amazing explosion in my mouth.  I make these every December for Christmas == but are good anytime of the year!  The ingredients are out of this world -- but I promise, they are extremely good!
DIRECTIONS
Preheat oven to 350 degrees.
CREAM TOGETHER:
1 c butter      1 c brown sugar     1 1/2 c sugar
ADD:
1 Tbsp milk    1 1/2 tsp vanilla
BEAT & ADD:
2 eggs
STIR IN:
1 c corn flakes (dry & crumbled)      3 c oats
SIFT TOGETHER THEN ADD:
1 1/2 c flour
1 1/4 tsp baking soda
1 tsp salt
1/2 tsp mace
1 1/2 tsp cinnamon
1/4 tsp nutmeg
1/8 tsp ground cloves
STIR IN:
4 oz coconut     1 pkg chocolate chips
Drop by well rounded teaspoons onto greased cookie sheet (or parchment paper).  Bake 10 minutes or until done.  Yields 8 dozen.
IMG_2682
AMY'S NOTES:  I did not sift all those dry ingredients... I added them to the mixture and they turned out fine.  I also always bake w/ parchment paper -- I never have to grease the cookie sheet or anything, and my cookies always turn out perfect!  It always states that it yields 8 dozen... but w/ my cookie scooper, it yields maybe 5 1/2 dozen?  If you make them smaller, then for sure it will make that many.  I also found that my time needed 11 minutes -- wait until it gets a little bit golden before you take them out.
IMG_2689
Another side note:  Since I didn't want to make the entire batch of cookies in one time, I used my cookie scooper and dropped them into a mini muffin pan and placed it in the freezer.  When they froze completely, I took them out with a spoon, and put in a freezer bag.  Now I'm able to make a few cookies at a time whenever I want!

IMG_2686

Monday, September 19, 2011

Peach Crisp

Book Club was last Thursday night, and I'm hankering for fall desserts.  Even when it's 99 degrees outside in the middle of September... I want it to be fall!

Found this recipe online at allrecipes.com, and modified it a little to fit my needs.

It's most definitely a keeper!

List of Ingredients

6 fresh peaches, peeled, pitted & sliced
1/2 tsp almond extract
1/2 c flour
1/2 c oatmeal
1/4 cup brown sugar
3/4 cup white sugar
1/2 tsp ground cinnamon
1/4 tsp salt
couple shakes of nutmeg
1/2 cup butter

**Note:  I used canned peaches!!  I just didn't add any of the juice to the pan.

Preheat oven to 375 degrees and grease an 8 inch square baking pan.

Place peaches in the bottom of the baking dish, and sprinkle them w/ almond extract.

In a bowl, combine the flour, oatmeal, sugar, brown sugar, spices and salt.  Cut the butter into the flour mixture w/ a pastry cutter until the mixture resembles crumbs.

Sprinkle the flour mixture in an even layer over the top of the peaches.  Bake in the preheated oven for about 45 minutes, or until the peaches are bubbling and the topping is browned.

**Amy's Notes:  I doubled the recipe to make a 9x13 pan, and got the big can of peaches at Sam's Club ($3.90).  I didn't use all of the peaches, but I did make sure I got a lot in the pan.  I also used half margarine and half butter -- make sure it's softened first!  Serve with vanilla ice cream!  Super yummy!

Wednesday, September 14, 2011

How to make whipped cream

I have the hardest time remembering how to make whipping cream.  It NEVER turns out right!  Thankfully, I found a good tutorial online ... somewhere... and I tried it out last night when I made my husband's birthday cake.

Cast of Ingredients

16 oz of heavy whipping cream
sugar (start with 2 Tbsp)
vanilla (1 tsp)

First of all, get the mixing bowl you are going to use, and the mixer tool (not the actual mixer, but those ... things!)  and put it in the fridge for at least 30 minutes.

After the bowl and beaters are chilled, pour the heavy whipping cream in the bowl, and add the vanilla and sugar.

Whip on medium until soft peaks are formed when you left your mixer.

Taste ... if it needs more sugar, add a little at a time.  **NOTE:  some people add sugar and vanilla at the end .. I added it at the beginning by accident and it still was OK. 

If you want to make chocolate whipping cream, add 3 Tbsp of cocoa powder plus another 1 1/2 tbsp of sugar (taste it as you go). 

Here is a GREAT link for more flavors and whipping cream recipes

Just an FYI:  One cup of whipping cream equals 2 cups of the whipped cream.  For the above recipe, you can always cut in half for a smaller portion!

Tuesday, August 30, 2011

BBQ Chopped Salad

I love BBQ chopped salad!  Every time I go to BJ's, I order it.  Cheesecake Factory has it .. and I am in love!!  I knew it would be relatively easy to make -- but I do have one picky child who has a slight aversion to vegetables.  If SHE will eat this, then I know I have a winner!!

I searched the internet to find a relatively easy recipe, and from there, just created my own salad.

IMG_7640

Ingredients
1 head of iceberg lettuce
1/2 of a jicama
1 can of corn (drained)
1 can of black beans (drained)
2 roma tomatoes (cut small)
1 green onion, cut thinly
1 avocado
Monterey Jack cheese (shredded)
grilled chicken w/ BBQ sauce on top
1/3 cup of BBQ sauce
1/3 cup of Ranch dressing
(optional)  French's Fried Onions
It was a time consuming process all at once -- but if you could have some of these already cut up, then it could be assembled fast.  While the chicken is grilling, cut up the lettuce into small pieces, cut up the jicama, tomatoes & green onion.  Drain the corn and black beans.  Cut up the avocado. 
 
 
I had four plates -- and one head of iceberg lettuce was too much, so maybe start with half a head?  I just piled on the toppings, complete with the chicken on top.  Mix the BBQ and the Ranch dressing together, and that is the dressing that goes on top of the salad.  I did not use very much on each person (because of the calorie and sugar count!) -- but enough to give it some taste.  I did add some French's Fried Onion on the top of it (b/c BJ's has onion straws on top of theirs) -- but next time I will do without.  I couldn't even taste the onions on it!  Probably next time I would do two avocados instead of one for four plates. 

Next time, I might even do two parts of BBQ to three parts of Ranch dressing.  (Maybe do 1/4 cup of BBQ and 1/3 cup Ranch? -- not sure, but I do remember tasting the Ranch dressing more at the restaurants).

Did my one said child eat the salad?  Yep!  My other salad eating child proclaimed it to be "the very best salad I have ever eaten!"  It truly was delicious!

Monday, August 29, 2011

Coconut Lime Banana Zucchini Bread

Wow!  That was a mouthful to say and to type! I got this recipe from a friend of mine (Jen)'s friend Cynthia (thanks Cynthia!)!  She posted on Facebook that she was making this bread, and I was curious and asked her to share the recipe!  She did!  I'm not sure where she got the recipe, but I made it today!  It was delish!
IMG_7612
Ingredients
2 cups all purpose flour
3/4 tsp baking soda
1/2 tsp salt
1 cup sugar
1/4 cup (1/2 of a stick) softened butter
2 eggs
1 to 1 1/2 cups smashed bananas (about 3 bananas)
1/4 cup yogurt (plain or vanilla)
3 tbsp apple juice or applesauce
1/2 tsp vanilla
1/2 cup coconut flakes
1 tbsp coconut (to sprinkle on top)
1 zucchini, grated
Glaze
1/2 cup powdered sugar
approximate 1 1/2 tbsp fresh lime or lemon juice (about 1 lime)

Directions:
1)  Mix the first three dry ingredients in a small bowl and set aside.
2)  Mash up the bananas with a fork and set aside.
3)  Crack two eggs and toss them in your mixer.  Add the butter.  Add the sugar and beat everything on medium speed for about 1 minute.  Add the bananas, zucchini, yogurt, apple juice/sauce, vanilla and coconut.
4)  Mix until well blended.  Add the dry ingredients.  Mix until moist.  Pour into greased bread pan (spray w/ Pam first!), and then sprinkle coconut on top.  Bake for approximately an hour at 350 degrees.
5)  Prepare the glaze:  mix 2 ingredients into bowl until glaze is slightly runny.
6)  When bread is done, let it cool on a rack for 5 minutes, then take out of pan and pour glaze over the top (put wax paper or pan down to catch the drips).
7)  Cut a slice, place a bite in your mouth, sigh and close your eyes.  Yummm!  Feel all those flavors come together and party in your mouth!

Amy's Notes:

OK, I added a full stick of butter!!  OOPS!  It was still delicious (probably made it even more delicious?).  I also used unsweetened applesauce, not apple juice.  I did not follow the directions to the T (meaning I added the eggs after I beat the butter and sugar -- it still turned out).  And finally... I added a ton more coconut on top than what the recipe called for.   I also baked for about an hour and 7 minutes -- it probably could've been reduced to about 325 for 10 minutes after the hour b/c some of the middle was still runny!

IMG_7621

Saturday, April 16, 2011

Whoopie Pies!!

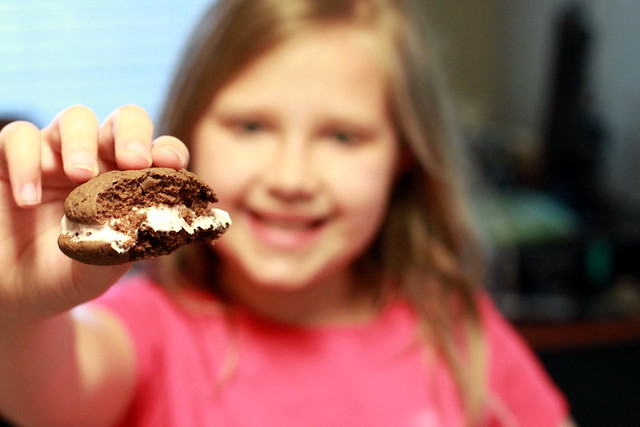
I had to laugh when I titled this post "Making Whoopie Pies."  I almost titled it "Making Whoopie", and then thought that probably sounded a little dirty... and totally inappropriate from a mom who blogs mostly about her girls....

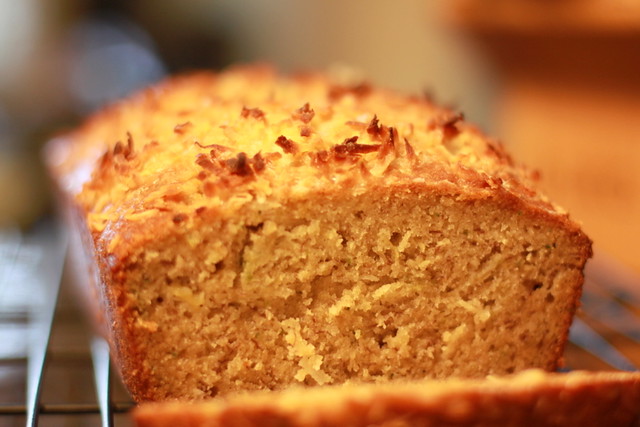
It seems like Whoopie Pies are everywhere these days.  I see them advertised at my gas station of all places, they're featured in magazines!  Featured on blogs!  So, I decided they must be really really awesome, and when I saw the recipe in my February Family Fun magazine, I knew I had to get my little baker and get to baking.

So we did!  And we learned a lot!  First lesson to learn?  READ ALL THE DIRECTIONS THOROUGHLY!  Remember in 5th grade where you get a paper that has all these questions on it, and you answer away and think "wow, I'm SO going to ace this quiz!"  Then when you get to the bottom, the last question said "do not answer any of these questions, and turn into the teacher now."  gulp  Oops.  FAILED big time!

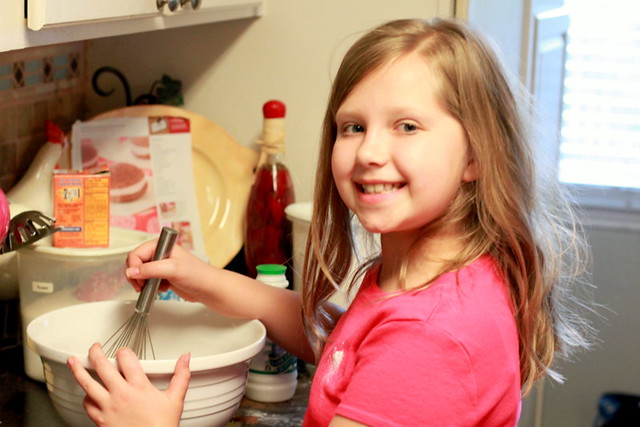
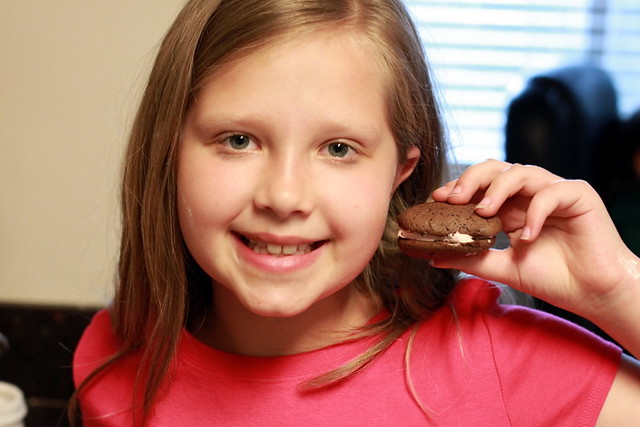
Now, I am trying to teach Maddie how to read a recipe, and when I realized that we were doing it incorrectly, it was a great teaching experience.  Now I hung my head in shame....  and happily, they still turned out wonderfully! 

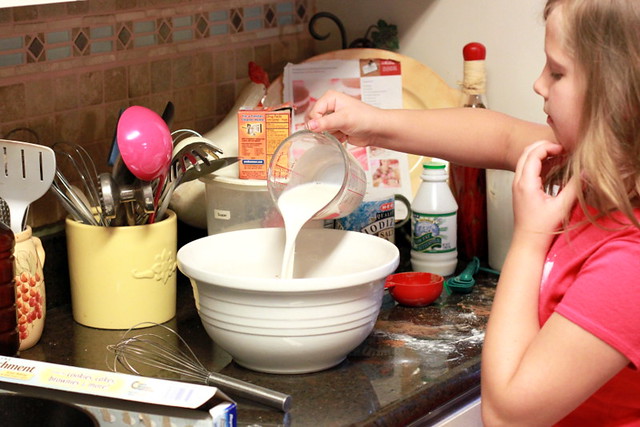
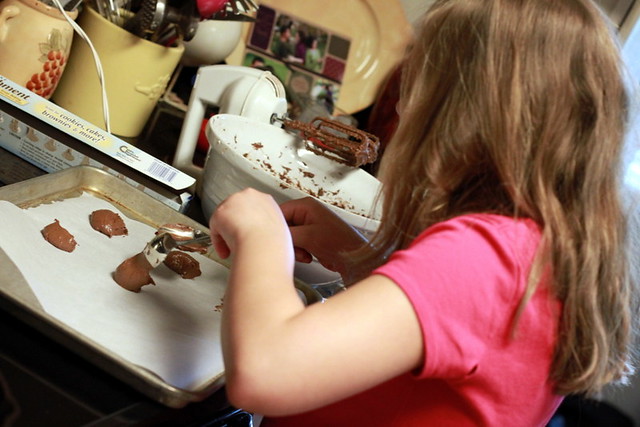
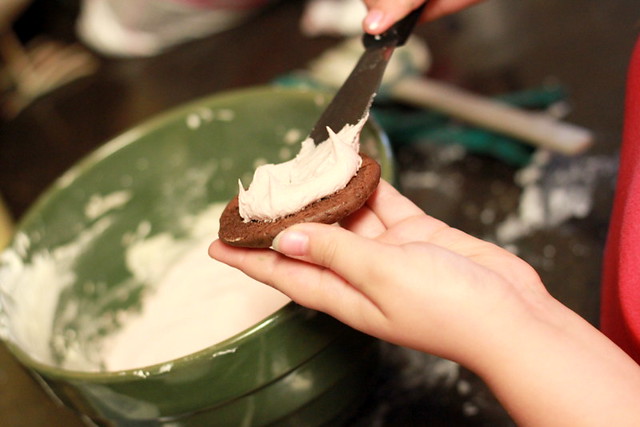
I was practicing my photography with my camera on manual -- so I used this opportunity to snap pictures of Maddie in action.

IMG_2260


IMG_2261


IMG_2271


we did an "oops" here.....

IMG_2272


IMG_2274


IMG_2276


IMG_2287

I love all the flour on her face!

IMG_2280


IMG_2285


You can get the recipe complete with pictures on the Family Fun website, but I transferred it over for you as well.
 Cake
    • 2 cups flour
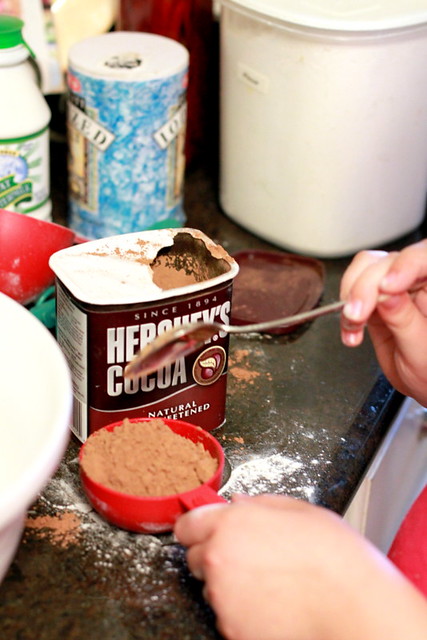
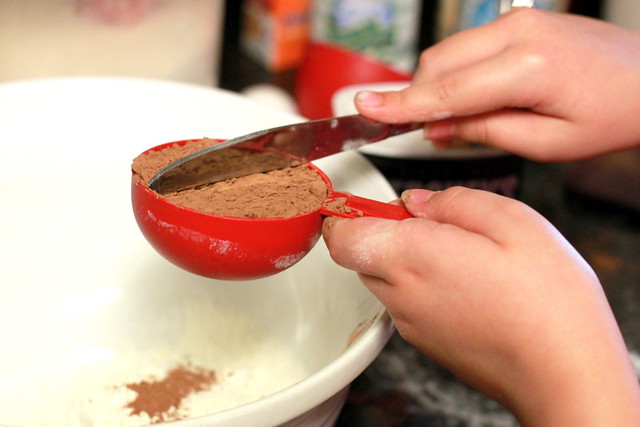
    • ½ cup unsweetened cocoa powder
    • 1 teaspoon baking soda
    • ½ teaspoon salt
    • 1 cup buttermilk
    • 1 teaspoon vanilla extract
    • ½ cup softened butter
    • 1 cup sugar
    • 1 egg
FILLING
    • ½ cup softened butter
    • 1½ cups confectioners' sugar
    • 1 cup marshmallow crème
    • 1 teaspoon vanilla
    • Red food coloring (optional)
1)  Heat the oven to 350°. Line two baking sheets with parchment paper.

2)  In a medium bowl, whisk together the flour, cocoa powder, baking soda, and salt. In a glass measuring cup or small bowl, stir together the buttermilk and vanilla extract.

3)  In a large bowl with a hand mixer set at medium speed, beat the butter and sugar until evenly blended, about 1 to 2 minutes. Add the egg, increase the speed to high, and beat until smooth and creamy, about 1 minute more.

4)   Pour half the flour mixture into the butter-sugar mixture, and beat at medium speed until combined. Add the buttermilk mixture and continue beating until just blended. Add the remaining flour mixture and beat again.

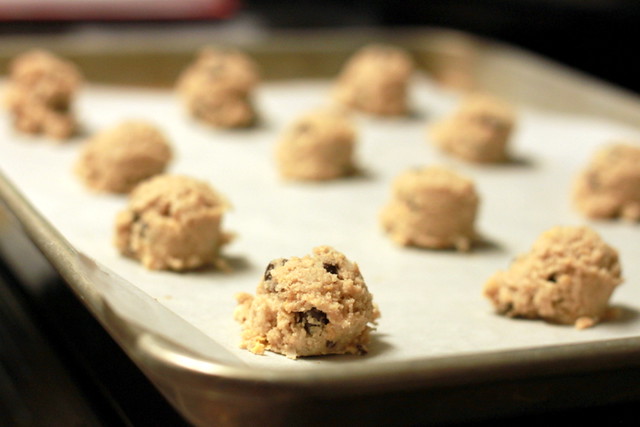
5)  Use a cookie scoop or spoon to place a heaping tablespoon of batter on a prepared cookie sheet. Add more mounds of batter, evenly spacing them, until there are nine on each sheet. Slightly flatten each mound with a spoon.

 6)  Bake the cakes one sheet at a time for 10 minutes (they should be moist and spongy). Let them cool on the sheet for 2 minutes, then carefully transfer them to a rack to cool completely. Reline the sheets and scoop, shape, and bake the remaining batter.

7)  Using an electric mixer at medium-high speed, beat all the filling ingredients except the coloring in a medium bowl until evenly blended, about 2 minutes. If you want to give the filling a Valentine hue, fold in drops of red food coloring until the desired tint is reached.
 
8)  To make each pie, spoon and spread a heaping tablespoon of the filling onto the bottom of a cake, then gently press another cake on top.

Saturday, February 5, 2011

Death by chocolate cupcakes.... literally!

IMG_0634-1

A few weeks ago I found this amazing recipe on Amanda & Kevin's blog and I knew I had to try it out.

Chocolate cupcake.

Chocolate Mousse inside chocolate cupcake.

Chocolate frosting on top of chocolate cupcake with chocolate mousse inside.

Chocolate candy on top of chocolate cupcake with chocolate mousse inside with chocolate frosting on top.

I mean... what's there not to love about this cupcake?  It's a recipe that was created JUST FOR ME!!

So, I made these for Katie's birthday.  Let me say... it was divine!!  and time consuming.....

IMG_0626-1
Here is the recipe: 

List of Ingredients:
1 box Devils Food Cake Mix
1 small box Jello Chocolate Fudge instant pudding mix
4 eggs
1/2 cup vegetable oil
1 cup milk
1 cup sour cream

Chocolate Mousse Filling
2 cups heavy whipping cream
2 cups milk chocolate chips

Chocolate Buttercream Frosting
1 stick softened butter
2 1/2 to 3 cups powdered sugar
1/4 cup cocoa powder
1/2 tsp vanilla
1/4 cup of boiling water
1 bag mini Snickers (I used Reese's Peanut Butter cups)

1. Preheat oven to 350 degrees F. Line 24 cupcake tins with liners. To prepare the cupcakes, place the cake mix, pudding mix, eggs, oil, milk and sour cream into stand mixer. Beat until well combined, about 2 minutes. Scoop the batter evenly into the cupcake liners. Bake for 20-25 minutes or until cupcakes are cooked through and a toothpick comes clean from center. Remove the cupcakes from the tin and let cool.

2. To prepare the mousse, melt the milk chocolate chips in the microwave, stirring every 30 seconds. Set aside to cool. Meanwhile, whip the heavy cream with a stand or electric mixer until it looks like whipped cream and stiff peaks form. Fold melted chocolate chips into whipped cream until well combined, then transfer batches into a piping bag. When cupcakes have cooled, press the tip of the piping bag into the center of the cupcake, about 1 inch deep. Squeeze the mousse into the cupcake while pulling the tip out. It doesn’t take much, just one firm squeeze is perfect. Continue filling all the cupcakes.

IMG_0623-1

3. To prepare the frosting, beat the butter, powdered sugar, cocoa and vanilla & hot water until well combined and a nice frosting consistency. Spread over cupcakes then top with chopped Snickers (or other candy).

Makes 24 cupcakes.  (actually, for me, it made 33)

While I loved Amanda's directions and beautiful pictures on her blog that went well with the recipe, I found that I had a few more steps that I needed to do. 
  • First of all, chill the chocolate mousse!!  After you get done making it, put it in the fridge for a bit to harden up. 
  • Let your cupcakes TOTALLY cool (like, for several hours!) before you pipe it inside the cupcake. 
  • If you do the Reese's PB Cups, buy like 3-4 of the packages of candy (I'm talking about the individual sized that has 8 in a package?... like for $1 each?  I bought only 1 package, and it only covered 8 cupcakes).
  • and finally, Amanda didn't have anything liquid for her frosting, and I used this recipe that came out of my Better Homes & Garden cookbook (it's the no-cook Fudge frosting), but it calls for boiling water... butter, vanilla, cocoa powder & confectioners sugar is NOT going to make frosting, something liquid needs to be added, so start w/ 1/4 cup of boiling water and go from there).
This recipe is MOST definitely a keeper for our family!  I think I'm going to try a French Vanilla cake mix next to see how that would taste w/ chocolate mousse!!


IMG_0630-1
::drooling::


IMG_0631-1
Yummmmmmmmmmmmmmmmmmmmm

IMG_0635-1
One final picture??


IMG_0638-1
Related Posts with Thumbnails